最近在学习 Linux 中的蓝牙开发,最想说的一句话就是:BlueZ 真的很难用。
BlueZ
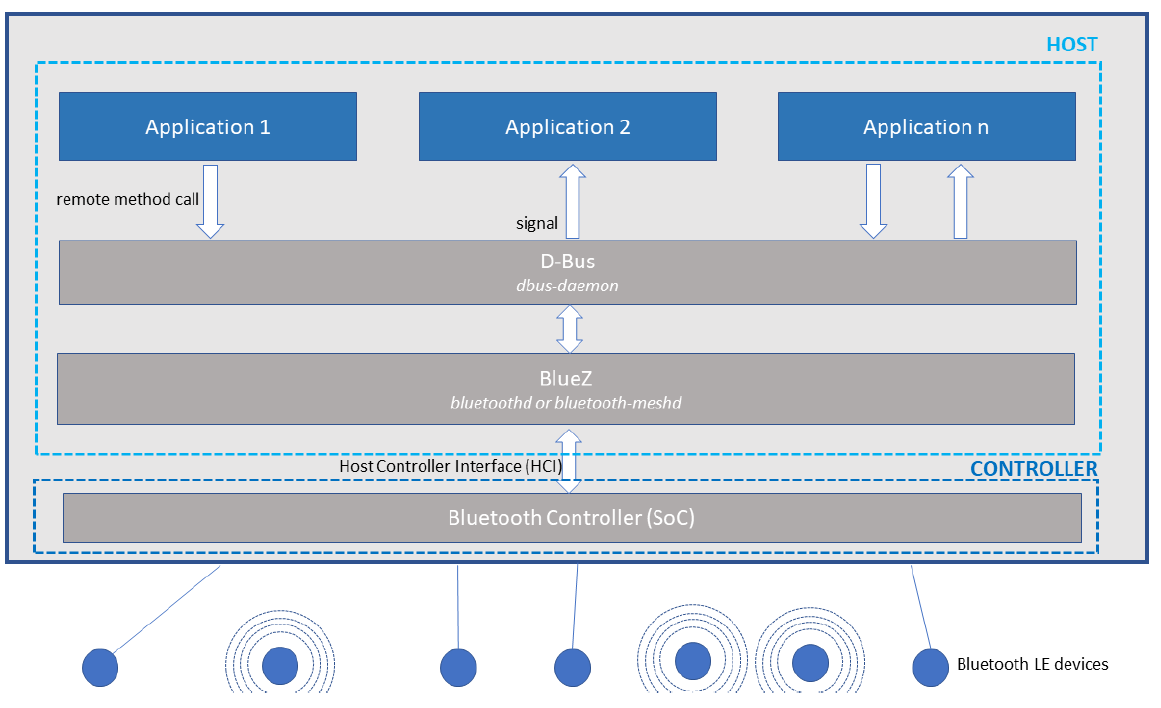
BlueZ 是 Linux 官方的蓝牙开发框架,架构如下图:
- BlueZ 实现了蓝牙协议栈中的 Host 部分。
- 应用与 BlueZ 之间通过 D-Bus 进行通信。
- BlueZ 与控制器(Controller,即蓝牙芯片)之间通过 HCI 接口通信。Controller 在 BlueZ 中也被称为 Adapter。
D-Bus
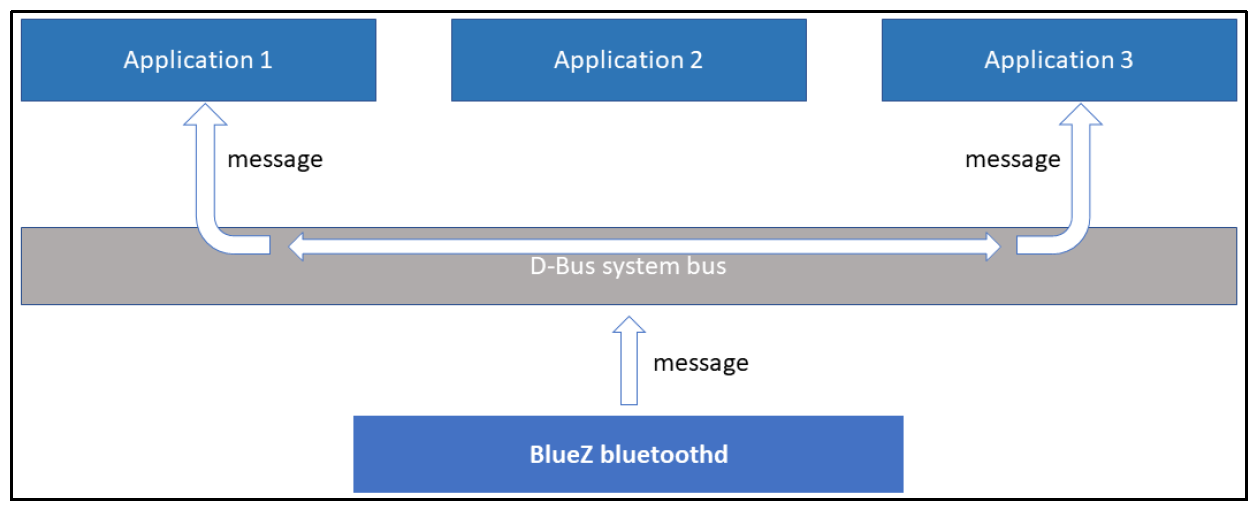
D-Bus 是一个通用的进程间通信中心,只要连接到同一个 D-Bus 总线上的进程都能相互发送消息。BlueZ 从 5.52 开始只使用 D-Bus 作为应用接口,抛弃了传统的 API 接口。
D-Bus 有两种类型的总线:
- 系统总线。全局唯一的总线,一般的系统服务(如 BlueZ)都连接到系统总线上。
- 会话总线。每个登录会话都会生成一个会话总线。
D-Bus 连接
BlueZ 的 bluetoothd 守护进程连接到系统总线上,作为服务端。我们编写的应用进程也连接到系统总线上,作为客户端调用 BlueZ 提供的接口。
每当一个进程连接到总线上时,D-Bus 会给进程分配一个唯一的名字,以 : 开头(如 :1.16)。但是知名的服务都会另外注册一个别名,方便应用访问。比如 bluetoothd 的名字为 org.bluez。
D-Bus 面向对象概念
D-Bus 使用了类似面向对象的设计。
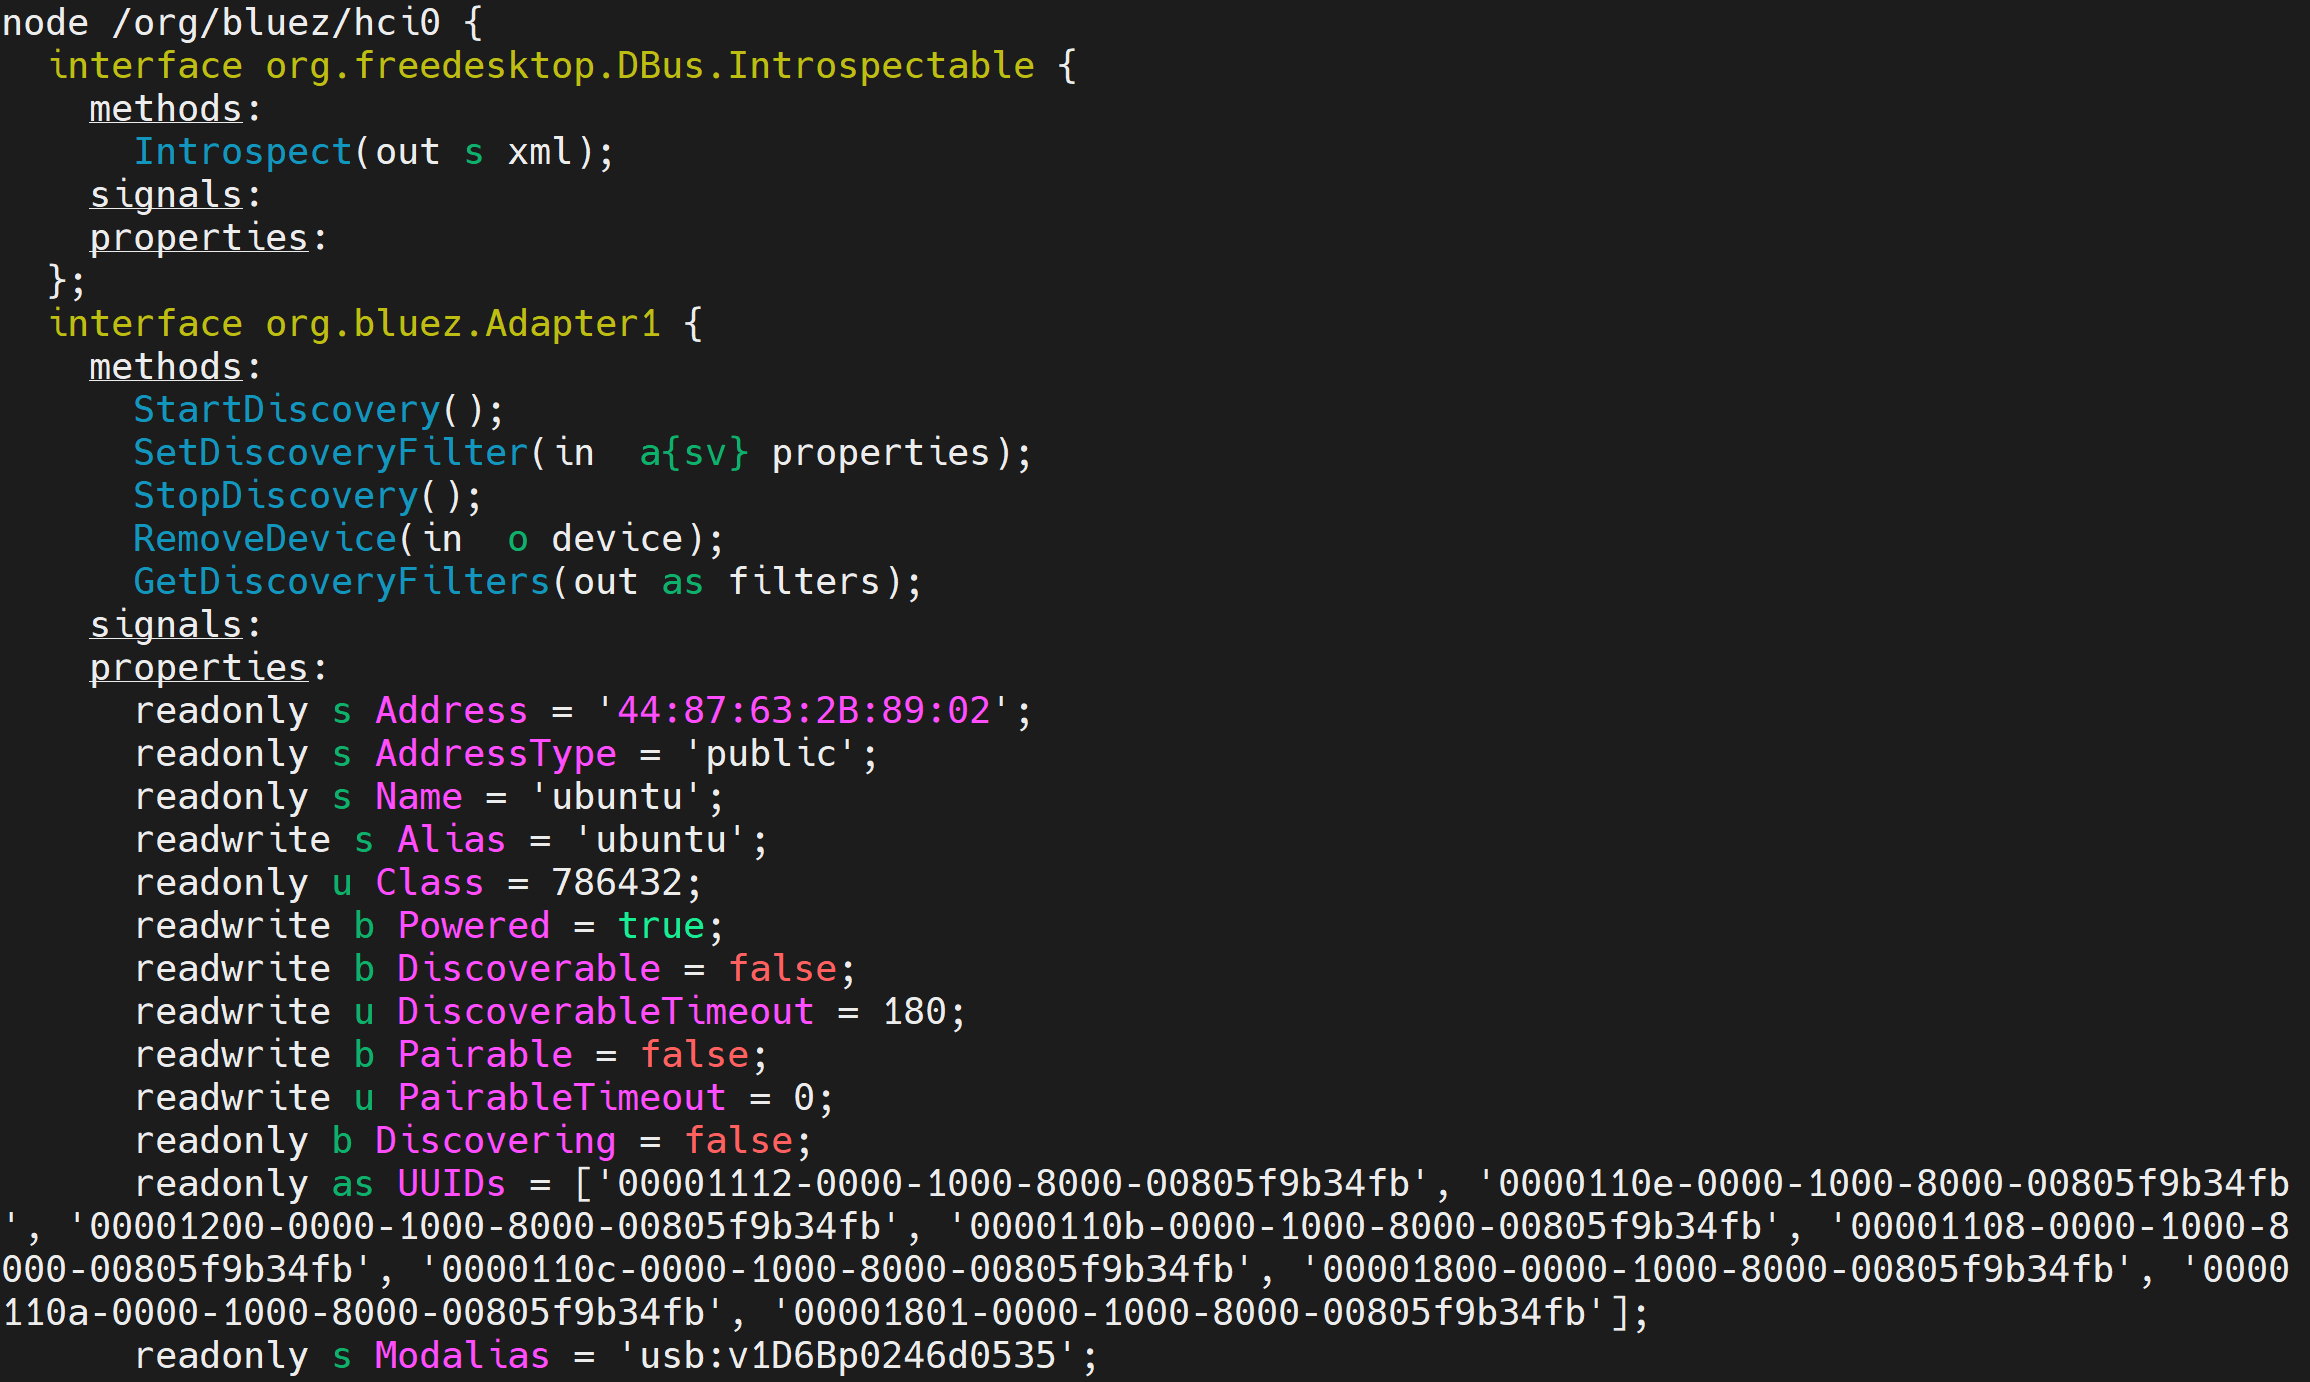
每个连接到总线上的服务,都包含了一些对象。对象用路径形式表示,有层级关系,比如 /org/bluez/hci0 表示一个蓝牙适配器对象,/org/bluez/hci0/dev_4C_D7_64_CD_22_0A 表示 hci0 下的一个蓝牙设备。
对象会实现一些接口,接口中定义了方法、信号和属性。接口用域名形式表示,如 org.freedesktop.DBus.Introspectable、org.bluez.GattManager1。
- 方法可以被其他应用通过 D-Bus 调用。
- 对象在发生某些事件时会触发信号,任何注册过这个信号的应用都会收到通知。
- 对象还包含属性。应用可以访问和修改属性。
我们可以用 gdbus introspect 命令查看指定对象上包含的接口,比如:
该命令告诉 D-Bus 我们要查看系统总线(-y)上的服务 bluez(-d "org.bluez")中的对象 "/org/bluez/hci0"。这个对象表示的是蓝牙控制器。该命令将列出这个对象上的所有接口,包括接口中的方法、信号和属性,输出如下:
D-Bus 标准接口
DBus 定义了一些标准接口,基本上所有服务(包括 BlueZ)都会实现这些接口。
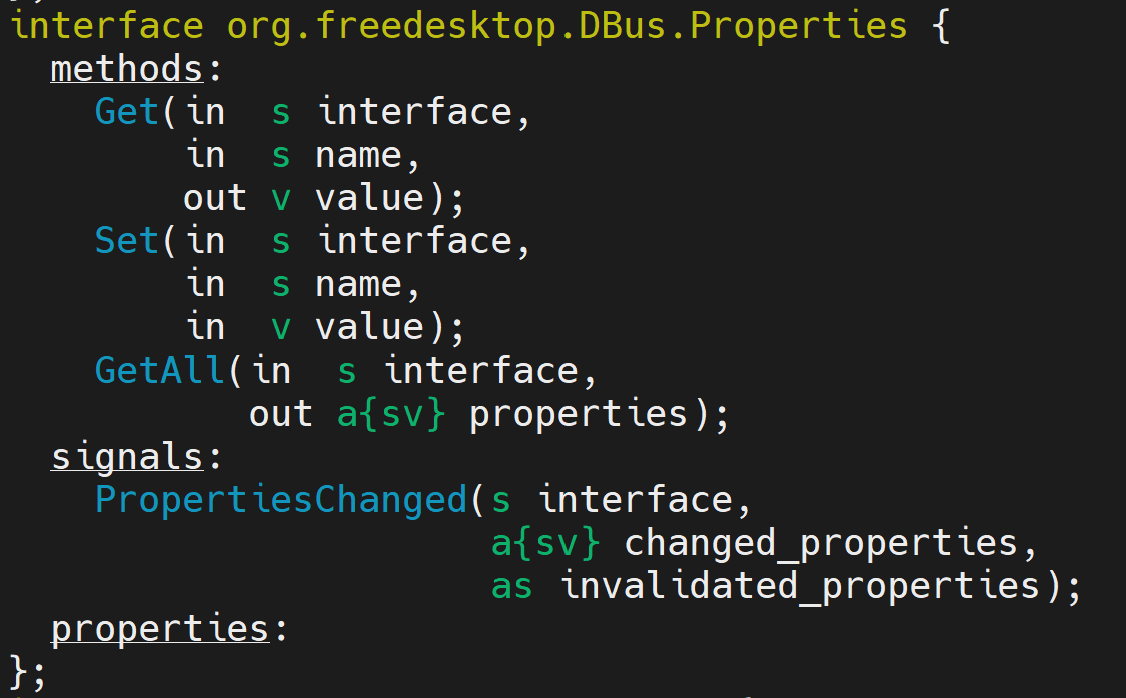
org.freedesktop.DBus.Properties
Properties 是最常用的接口,其他接口中的属性实际上都是通过该接口中的 Get/Set/GetAll 方法进行读写的。该接口还包括一个 PropertiesChanged 信号,当同一个对象上其他接口中的属性发生变化时,会触发这个信号通知使用者。
几乎所有对象上都会实现这个接口,比如 bluez 的 /org/bluez 对象:
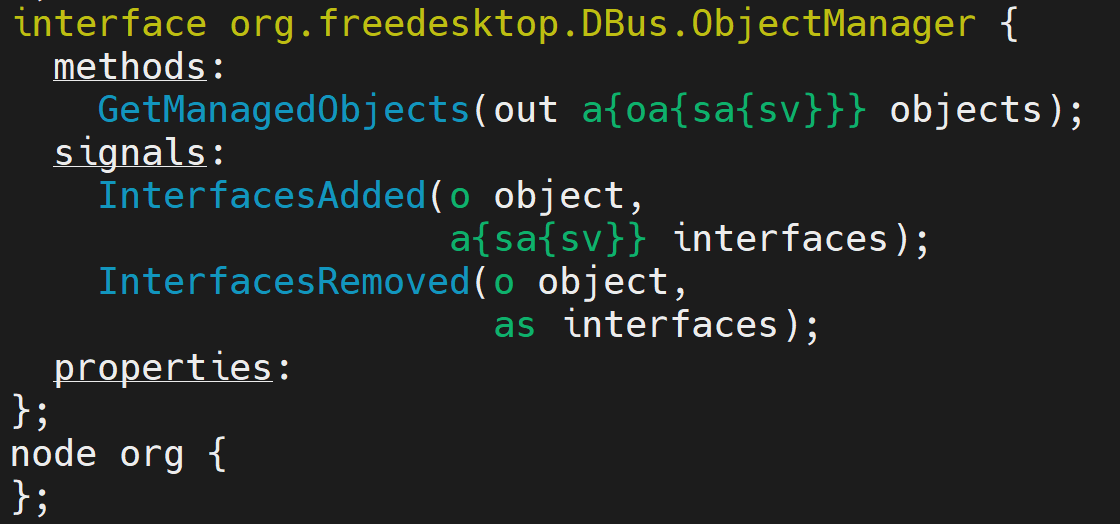
org.freedesktop.DBus.ObjectManager
ObjectManager 接口用于管理对象。比如在 BlueZ 中,可以用 ObjectManager 来管理所有扫描到的蓝牙设备。调用 GetManagedObjects() 方法并从中筛选出所有蓝牙设备,并且每当扫描到一个新的设备,InterfacesAdded 信号就会触发。
D-Bus 数据类型
正如上面使用 gdbus introspect 观察到的接口信息中,我们可以看到 DBus 方法和信号的参数、属性都使用一些特殊的标识(比如 o、as、a{sa{sv}} 等)来表示该变量的数据类型。类型系统的详细描述参考 D-Bus Specification,这里进行简单介绍。
基础类型
基础类型包括数值类型和字符串类型。
数值类型:
yuint8bBooleannint16quint16iint32uuint32xint64tuint64ddoublehhandle,Unix 系统上的文件描述符类型
字符串类型:
sString 字符串o表示一个 DBus 对象路径(如/org/bluez/hci0)gSignature,类型标识形式
容器类型
容器类型有 4 种:STRUCT、ARRAY、AVRIANT 和 DICT_ENTRY。
STRUCT 类型用 () 表示,可以嵌套:
(ii)表示包含 2 个 int32 的结构体(s(ii))
ARRAY 以 a 开头,后面跟着列表中元素类型:
as表示一个列表,列表元素为 Stringa(ii)表示列表元素为结构体(ii)
VARIANT 表示可变类型。
DICT_ENTRY 是一个 key-value 类型,类比于 C++ 中的 std::pair,用 {} 表示。编程语言中常见的字典,可以用 ARRAY 和 DICT_ENTRY 组合在一起表示:
a{sv}表示了一个字典。字典的 key 是 String,value 是可变类型。
D-Bus 工具
调试 D-Bus 时可以借助一些命令行工具,包括 dbus-monitor、dbus-send、gdbus 等。
dbus-monitor
dbus-monitor 可以监听 DBus 总线上的所有的信号和方法调用。
监听系统总线:
只监听信号:
只监听指定路径:
dbus-send
dbus-send 可以手动向 DBus 总线发送消息,包括触发信号、调用其他服务的方法等。
在另一个窗口试着向 DBus 发送信号:
该命令在系统总线上触发了一个信号,发送信号的对象是 /com/example,接口是 com.example,信号名为 Greeting,参数为字符串 "hello!"。在 dbus-monitor 的监听窗口下就能看到信号被触发的打印。
dbus-send 也可以用来进行方法调用。以 BlueZ 为例,我们如果想得到蓝牙适配器的地址,可以读取 /org/bluez/hci0 对象中 org.bluez.Adapter1 接口中的 Address 属性,前文介绍过,属性的读取都是通过 org.freedesktop.DBus.Properties 接口进行的,实际命令如下:
输出会返回 Address 属性值,类似于:
gdbus
gdbus 是 GLib 封装的一套 dbus 命令行工具,比原生的 dbus-* 命令更简单易用。
比如用 gdbus introspect 命令可以查看某个对象中包含的接口:
该命令告诉 D-Bus 我们要查看系统总线(-y)上的服务 bluez(-d "org.bluez")中的对象 "/org/bluez/hci0"。这个对象表示的是蓝牙控制器。
gdbus 同样可以实现 dbus-* 系列命令的功能。比如用 gdbus monitor 监听 bluez 服务:
用 gdbus emit 发送信号:
用 gdbus call 调用方法:
D-Bus 编程
用户是通过 DBus 与 BlueZ 进行交互的,在深入 BlueZ 之前必须掌握 DBus 的编程开发方法。DBus 本身是一个消息总线,不同的编程语言中有相应的库实现了与 DBus 的 RPC 通信,比如 C 语言的 gdbus、python 的 python-dbus 等。为了方便,这里使用 python 进行编程示例,掌握了 DBus 的基本概念之后,使用其他语言的库也能很快上手。本节只涉及 DBus,而不涉及 BlueZ。
前置条件
以 ubuntu 为例,确保安装了以下包:
方法调用
DBus 系统总线上都有一个 hostname 服务,我们用 gdbus introspect 查看一下这个服务:
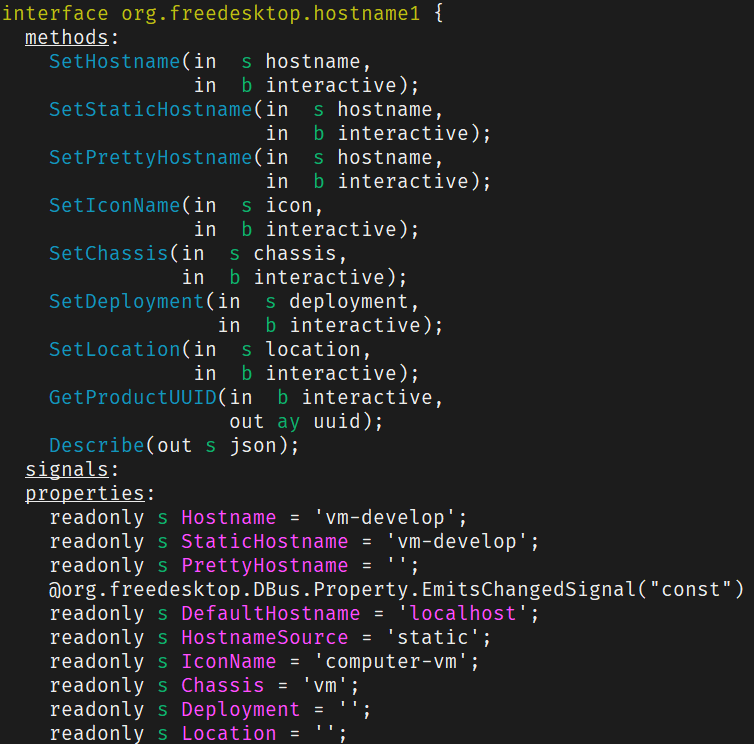
可以看到其中有 Hostname 属性。
用 python 读取其中的 Hostname 属性:
- 首先拿到
org.freedesktop.hostname1服务中的/org/freedesktop/hostname1对象; - 获取该对象上的
org.freedesktop.DBus.Properties接口; - 调用
Properties接口中的Get方法读取属性。Get方法参数中传入接口名和属性名,表示我们要读取hostname1接口中的Hostname属性。
#!/usr/bin/python3
=
=
=
=
接收信号
以下代码监听信号:
- 创建 mainloop 事件循环;
- 调用
add_signal_receiver监听信号,监听接口com.example中的信号Greeting; - 收到信号时调用
greeting()打印接收的信息。
=
=
运行上面的 python 代码,然后在另外一个终端向 dbus 发送信号:
可以看到运行 python 代码的窗口中 “hello” 被打印出来了,表示我们收到了信号。
注册对象
像 BlueZ 等服务都在 DBus 总线上注册了很多对象,提供接口和接口里的方法来给其他应用调用。我们自己也可以向 DBus 注册对象,以此来接收方法调用。
dbus-python 中凡是继承自 dbus.service.Object 的对象,都会自动成为 DBus 对象,在 DBus 总线上可以被其他应用和服务访问到。
#!/usr/bin/env python3
=
= 0
= +
return
=
=
=
以上代码注册了一个 Calculator 对象:
- 继承自
dbus.service.Object。路径为/com/example/counter。 - 方法用
@dbus.service.method装饰器注册。这里注册了一个Increase方法,属于com.example.Counter接口,输入参数类型为 “i”(int32),输出为 “i”(int32)。 - 信号用
@dbus.service.signal装饰器注册。当Counter中计数超过 10 时,触发CounterOverflowed信号。